A printed fence screen only looks as good as its installation. Get the fasteners and spacing right and the panel sits flat, reads cleanly from across a field, and survives a storm. Get them wrong and you end up with a sagging, flapping banner that frays at the grommets within a season. This walkthrough covers how to hang a screen on standard chain-link the way commercial installers do it, with the spacing and tensioning details that most first-time buyers miss.
Start with the fence, not the screen
Before anything gets unrolled, confirm the fence can carry the load. A fence screen turns an open chain-link fence into a solid sail, and the wind force involved is larger than people expect. Using ASCE 7 wind-load assumptions, a single 10-foot section that is 6 feet tall presents roughly 60 square feet of surface, and at a 100 mph design wind that section can see on the order of 1,500 pounds of force before you even account for gusts. That is why screening is best suited to fences with concrete-set line posts, a top rail, and, ideally, a bottom tension wire. If your posts are loose in the ground or the mesh is already leaning, screening will accelerate the failure rather than hide it. Walk the line first and reset any post that moves when you push on it.
Measure the run and the height while you are there. Order the screen to the fabric height of the fence, and plan to overlap adjoining panels by a few inches at the seams so there is no gap where two rolls meet. If the fence has gates, treat each gate as its own panel so the screen can swing with it.
Attach to the mesh side, and hang from the top first
Screens go on the chain-link side of the fence, not the post side. Mounted against the posts, the fabric rubs the rail and framework every time the wind moves it and wears through at the contact points within a season or two. On the mesh side it lies against a flat, continuous surface and moves as one piece.
Hang the top edge first. Secure it lightly to the top rail along the whole panel before you tighten anything, stepping back to check that the print is level and the top hem is riding straight. Only once the top is aligned do you work the sides from top to bottom, pulling small wrinkles out as you go, and finish with the bottom edge last. Tension is applied in that order for a reason: if you lock the bottom corners down before the top is square, every wrinkle above them gets trapped and there is no way to work it out without cutting ties.
Fastener spacing is the detail that decides longevity
Reinforced screens are built with grommets on roughly 12-inch centers around the hem, and the general rule is to engage every grommet you can rather than skipping down the line. How tightly you space the ties themselves depends on the fabric and the exposure. For heavier vinyl-coated mesh in ordinary conditions, a fastener every 12 to 18 inches is typical; lighter open-knit fabric mesh can often go 18 to 24 inches; and on exposed, high-wind sites you tighten everything to 12 inches or less. Closer spacing is not busywork. Each additional tie shares the wind load, so halving the spacing roughly halves the force each grommet has to hold, which is exactly what keeps grommets from tearing out along the top edge where the load concentrates.
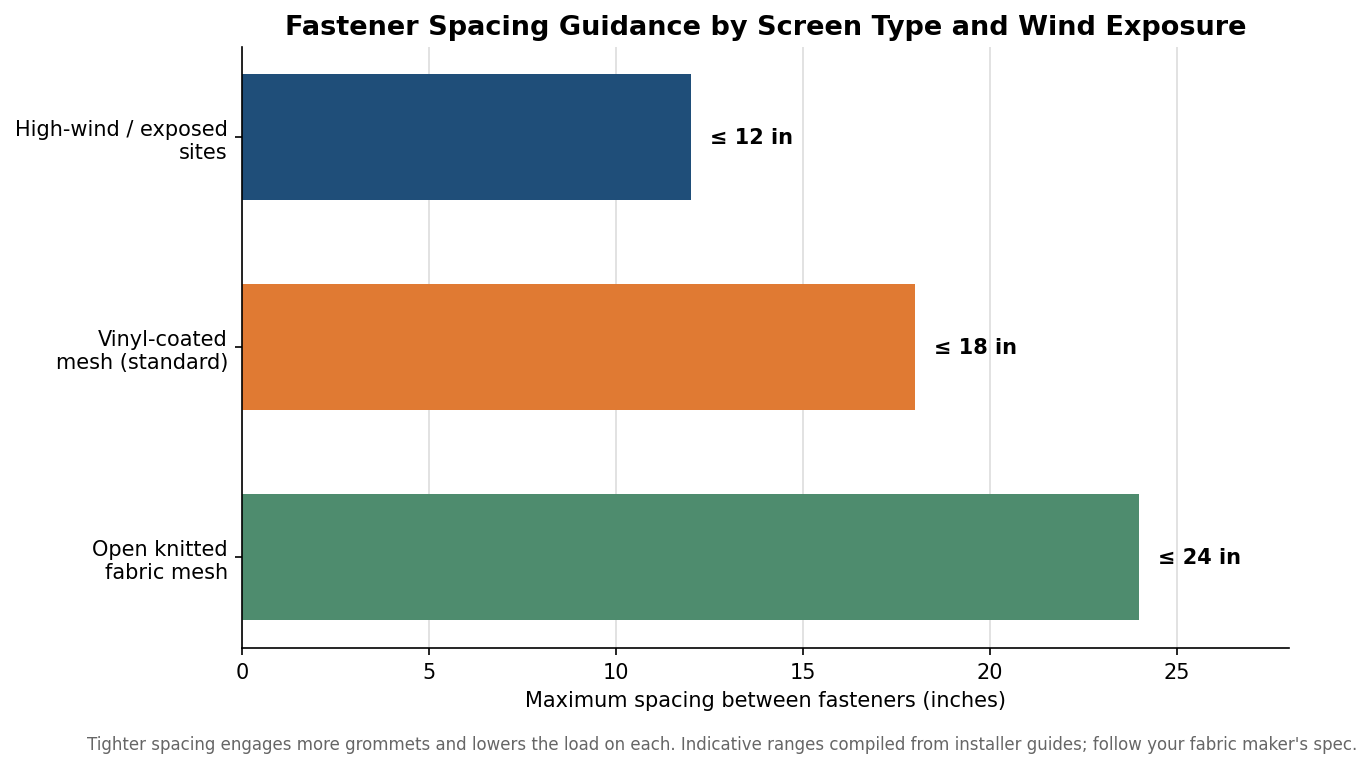
Use UV-rated fasteners, and match strength to position. A common commercial pattern is lighter 50-pound-test ties along the top and upper sides and heavier 120-pound-test ties along the bottom and lower sides, where the fabric wants to lift and billow. UV-treated zip ties are the default; stainless hog rings suit high-traffic facilities, and bungee ball ties are used on the most wind-exposed runs because they give a little in a gust instead of snapping. Whatever you use, buy UV-rated. Standard nylon ties from a hardware bin go brittle in sunlight and start shedding within a year, and many fabric warranties are voided by non-approved fasteners, so it is worth checking the spec before you buy a bag of the wrong thing.
Leave the screen room to breathe
The instinct to seal a screen tight to the ground is the single most common installation mistake, and it is the one most likely to bend a fence line in a storm. A screen blocks wind in near-direct proportion to its opacity: a panel rated at 85% blockage stops roughly 85% of the wind that hits it and lets the remaining 15% bleed through. That bleed-through is not a defect, it is the pressure-relief valve that keeps the whole assembly standing.
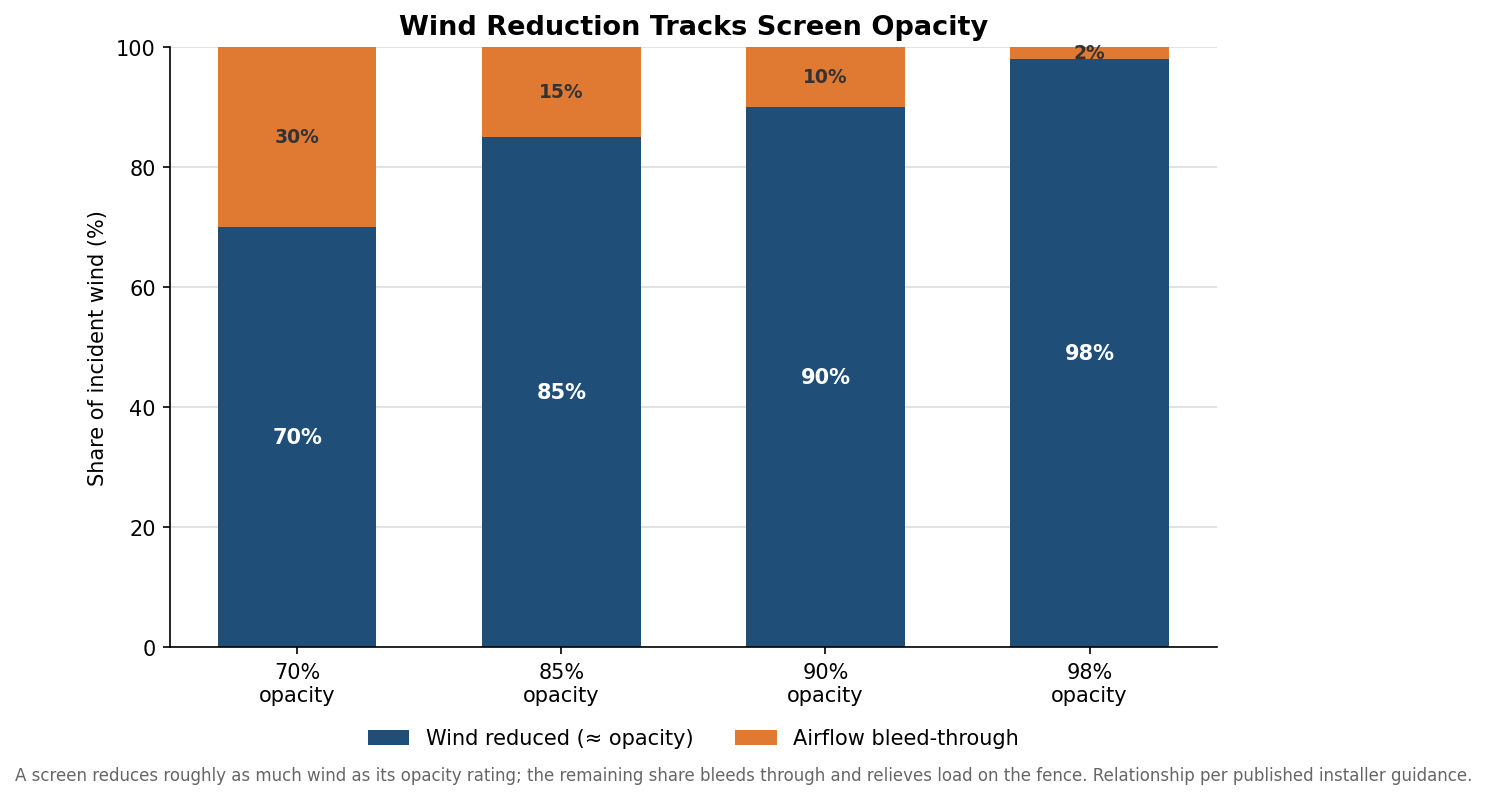
Two habits follow from that. First, leave a few inches of gap at the bottom of the panel so air has somewhere to go rather than loading the entire surface. Second, match opacity to exposure rather than defaulting to the most private option. On a sheltered courtyard a 90% or 98% screen is fine and gives near-total privacy. On an exposed ballfield or a rooftop, a 70% to 85% screen that breathes will outlast a near-solid one that turns the fence into a sail. If your priority is ball visibility on an athletic field, a 70% screen deliberately trades some privacy for that airflow. The right number is a wind-versus-privacy decision, not simply the highest blockage available.
Final pass and upkeep
Once the panel is up, walk the full length and do a final tightening, squaring the fabric against a tension bar or the fence framework as your straightedge. Angle the bottom ties slightly toward the taut corner to pull residual wrinkles flat, but stop short of stretching the fabric drum-tight; over-tensioning puckers the print and stresses the grommets just as badly as leaving it slack. Twice a year, walk the line again and replace any tie that has cracked or worked loose, especially along the top edge. A screen that is checked and re-tied on that cadence will typically hold its shape and color for years; one that is hung tight, sealed to the ground, and never touched again is the one that fails early. The install is not hard, but the details, correct side, top-down tensioning, tight enough spacing, and a deliberate wind gap, are what separate a screen that reads like signage from one that reads like a tarp.
Leave a Reply